Posts

Newest Whimsy Release - AlFA Doodles

Image
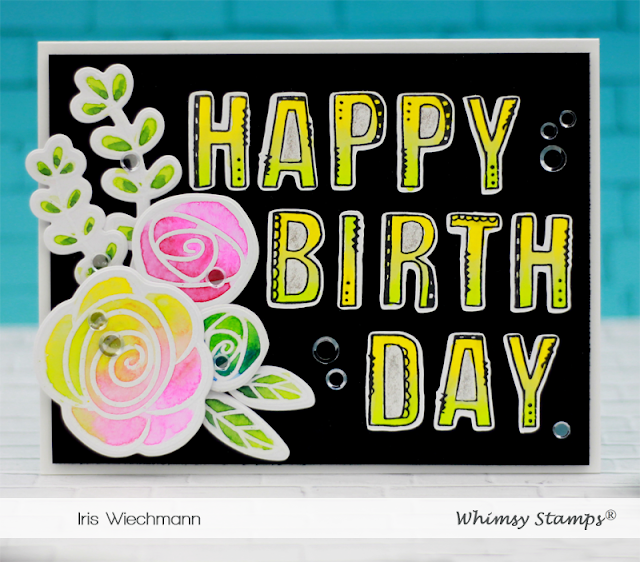
Happy Sunday All !  Have you seen the new Whimsy Stamps release yesterday? Today I am sharing a card made using  one of the new products, the NEW AlFA Doodles . I love this versatile alphabet set. It can be colored or just left as it is. For my card I chose to color it with alcohol markers and cut the letters out. I combined the  NEW AlFA Doodles  with the older    Beaucoup Bouquet  flower set which I white heat embossed and watercolored using Mission Gold watercolors. The I fussy cut the flowers. I love how bright the colors of the flowers and letters turned out. To make it even pop more I opted for a black background. I adhered the flowers with foam dots and the letters were glued. I added the image layer to a white A2 sized card base and added some clear iridescent confetti for some bling. Here are the links to the products used:                Hugs & stay safe everyone!

Cross-Stitched Greetings

Image
Happy Hump Day Friends! This is a fairly easy and quick (birthday) card to make. There is no coloring involved just die cutting, cutting with a paper cutter and stamping the sentiment. The products used are from the most recent release from Whimsy Stamps :  Cross-Stitched Sentiments and Quilted Rainbow Inlaid . To add some color and make the card pop more I used turquoise cardstock for the  Quilted Rainbow Inlaid . Here are the links to the products used:                  Hugs & stay safe my friends!

Whimsy Stamps Mini Release - Caveman Grog

Image
Hello Peeps! Here is my creation with a few of the new stamps from the most recent mini release by Whimsy Stamps .  I opted for a no-line design colored with Copics and a leafy stamped background which I also colored with Copics. First I stamped  Caveman Grog  with a Copic friendly fadeout ink so the lines would blend in while coloring. Then I made a mask and stamped the  Fern Background  with a green copic friendly ink.  After coloring the images I wanted to add a sentiment. To make it pop off my pretty busy background I used a strip of kraft cardstock to adhere it to. The kraft cardstock seemed too empty so I used the Footprint Background stamp and a watermark ink to add a bit background texture. Perfect! A few clear iridescent sequins finish off my card.  Here is a list for all the Whimsy products I've used:                     Stay safe!

Whimsy Stamps and Therm O Web Collaboration

Image
Whimsy Stamps and Therm O Web are teaming up once again for a fabulous week of inspiration and prizes! Be sure to visit both blogs all week long for some amazing ideas and to enter to win! Hello Everyone , welcome to Day 2 of  the  Whimsy Stamps  and Therm O Web Collaboration.  I' am sharing 2 cards with you today where I used different  Whimsy Stamps  products together with  Therm O Webs Electro-Pop Neon  products. On my first card I used the Rina K  Electro-Pop neon enamel transfer sheets  (Poppin' Pink & Orange Glow) and  neon glitz paste (Poppin' Pink)  together with the  Primitive Shaker Shapes  die set (Stars),  Twinkle Stencil  and  Bold Statements . How to create my card: Card base in white, top-fold A2 size; black cardstock panel 1/4" smaller than card base, white cardstock panel 1/2" smaller than card base, white cardstock, black cardstock Using the white cardstock panel and the Twinkle Stencil (sprayed with Pixie Spray Ste

You Are Absolutely Fabulous!

Image
Happy Sunday Everyone! This is another awesome NEW clear stamp set from Whimsy Stamps newest Mini-Release called 'Braided'.   This set is so much fun to color. Not only if you love to color hair but also if you want to practice coloring hair. I combined it with one of my most favorite Slimline dies from Whimsy, the  Slimline Five Frames Die . I t was released earlier this month. I offset some of the frames and popped the images up on some foam dots for more dimension. The images were colored using Copic markers and Polychromos pencils. When I combine Copics and pencils I prefer Polychromos because they are slightly harder than all my other pencils and hold their point exceptionally. This is what you need if you want to add fine details to images like that.  Whereas when coloring solely with pencils I prefer softer pencils.  Here are the Copic/Pencil colors I used: Brown Hair E30, E33, E37 Pencil: very dark brown almost black Red Hair YR04, YR07, E08, E18

Whimsy Stamps Release - Soul Sisters

Image
Hi there peeps! It's time for another Whimsy Stamps Release today. On my release creation I am showcasing the adorable Soul Sister clear stamp set and matching dies. I colored with Copics. The cloud background I used for the left window was inked with Distress inks and the one on the right is a piece of designer paper from the Bizzy Bees papers.  For the cushions I used the NEW Calico 6x6 papers. To create my card base and frame I used the Slimeline Card Builder die set. I love the versatility of this die because you have the option to create the windows for your slimline card the way you want or maybe you want non at all then just use the base frame. I used the square window to cut two windows on my slimline card. For the middle window I used the cut out from pink cardstock and created a white frame. The frame was put on top of the pink square in an offset angle to add some interest.  Here are all Whimsy products I used: