Posts

Mixed Media Hanging Beach Canvas

Image
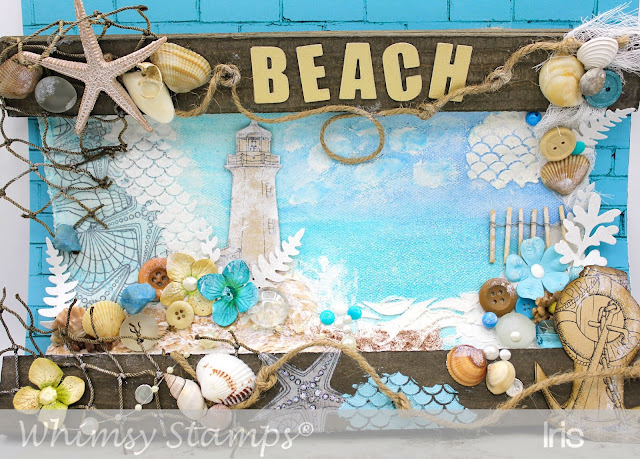
Hello Everyone! Today I have my last project from this years Whimsy Weekend Craft Retreat to show to you. A Mixed Media Hanging Beach Canvas. This was the project I was teaching in my class. It's a lot of fun to make and what I especially like with Mixed Media it is very forgiving and there is actually nothing that can go really wrong. Just have fun, dive into all the different mediums and have fun, fun, fun and let your creativity  take over! To prime the canvas I used gesso and after it had dried I added acrylic paint in shades of turquoise and blue. I stamped the awesome Whimsy Seashell background onto tissue paper (tim holtz plain tissue paper) with Versafine black ink. Let dry thoroughly then add part (or all if you prefer) of the shell tissue paper to the canvas using Super Heavy Gel Matte Medium (Liquitex). Then I started decorating the canvas with structure paste and stencils and added my embellishments and fussy cut images.  Here are all the Whimsy products I

Starfish Wishes

Image
Happy Weekend! I am back today with an ocean themed card. The main image is Naia the Mermaid from Whimsy Stamps. I had this image colored for a while and never came around making it into a card. So today I was browsing YouTube a bit and came across a video from Vicky   where she made an art journal page with an ocean / underwater background.  I cased her technique of the background for my card: I added some distress stain (dauber bottle) to a white card panel (I used mixed media paper), let it dry and used the Whimsy Waves Stencil to sponge on some waves with distress ink. After all the ink was dry I added some white splatters with picket fence distress paint. Using a white, super fine Sharpie poster pen I drew some bubbles and added 3D glaze to make them stand out more. I then stamped the castle from the Salty Hair clear set with Versamark ink and gold embossed the castle. The sentiment is from the same set as are the seashells and starfish stamps I used.  Naia the M

PaperDoor Recap

Image
Hello Crafty Friends! Just a little remider that today is the last day to purchase the July  PaperDoor  Beaucoup Bouquet kit! Here is a recap of all my cards made with this amazing kit this month: So what are you waiting for? Hop on over to the Whimsy store to get your  PaperDoor  kit! Here are the links to the Paper Door Kit depending on your location - the  postage is included  in the price shown: USA:    Paper Door Kit for USA customers Canada/Mexico:     Paper Door Kit for Canda/Mexico customers International:     Paper Door Kit for International customers Don't forget that the  Paper Door Kits  are  only available until July 25th!  Make sure you get yours today.   I also want to mention that this is  NOT a subscription . If you buy this box there are no strings attached. You will only buy this one box and no obligations to by the next one! So feel free to buy with confidence and without pressure of a subscription. Hugs,

PaperDoor July - only two more days!

Image
Hey Folks! If you have not yet ordered your    PaperDoor  kit and where postponing it - you might want to put your order in now! Wednesday will be the last day this amazing flower kit is available. After the 25th it will be gone from the shelves and no longer available! You can order your  Beaucoup Bouquet  PaperDoor  HERE! I have one more card to show I made with this amazing kit: And here is a close-up on the flowers. I've added some 3D glaze to them to make them look more 3D: Here are the links to the Paper Door Kit depending on your location - the postage is included in the price shown: USA:    Paper Door Kit for USA customers Canada/Mexico:     Paper Door Kit for Canda/Mexico customers International:     Paper Door Kit for International customers Don't forget that the  Paper Door Kits  are  only available until July 25th!  Make sure you get yours today.   I also want to mention that this is  NOT a subscription . If you buy

More July PaperDoor Inspiration

Image
Today I am back with two more cards I made with this months PaperDoor Beaucoup Bouquet.  No coloring on this card, only used the dies and embossed image and the scrumptious   PaperDoor   papers. I also added a bit to the inside of the card: Here is my second  PaperDoor   card for today, this time colored with distress inks that are included in the box : I stamped the image with Versafine Clair Morning Mist and part of the sentiment is stamped with Delicata Silvery Shimmer  ink . The word birthday was die cut and is from the Shaker Builder - Sweetest Birthday die set  - which is on SALE at the moment! Sentiment is from the Salty Hair clear stamp set. I decorated the card with some sequins, a rhinestone and a silver thread which is attached to the rhinestone. Whimsy products used:                         Here are the links to the Paper Door Kit depending on your location - the postage is included in the price shown: USA:

Stained Glass Flowers on Vellum

Image
Hey Friends , here's a card I made for the Whimsy Retreat back in June. It was one of my class projects or actually a make and take for attendees to do between classes. This was an exclusive rubber stamp only for the retreat attendees and it is not available to buy. But Whimsy Stamps has other beautiful stained glass rubber stamps available in the store. I stamped onto thick Vellum paper using Versamark ink and embossed with gold embossing powder . I colored the image with my Kuretake Clean Color Brush Pens on the front of the vellum to achieve bright colors. Coloring on the back of the vellum would result in more muted colors. The bright green glitter foil paper was from an older  PaperDoor  kit additional Whimsy products used:       Thanks for stopping by Hugs,

PaperDoor Beaucoup Bouquet Inspiration

Image
Happy Monday and Welcome to more PaperDoor inspiration!  As I said, I will be back with more Paper Door creations. Today I want to share two more projects I made using the  NEW July PaperDoor! Here is my first card for today made with the Beaucoup Bouquet  PaperDoor  kit: I love this months kit, it is SO versatile and the stylized flowers and foliage can be used almost on any project. If not the single focus on your card they can be used as embellishments as well or use them to create your background. The possibilities are endless! You can purchase your kit  HERE On the card above I used the included distress inks to color and do my background. Whereas on my second card I went for kraft paper from my stash and a different look with a different coloring medium. But see for yourself: I stamped the flowers onto kraft paper with VersaMark ink and heat embossed with the included white Ranger embossing powder. I used water based grey markers (Tomb