Posts

Whimsy January Release - Day 2

Image
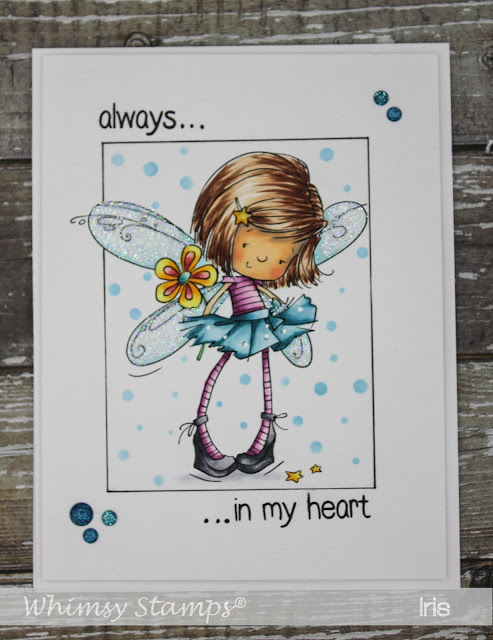
Hello Everyone and Welcome to Day 2 of Whimsy's January Release Week. Today I have yet again another CAS style card using the new rubber stamp ' Flower Fairy' by Marina Fedotova. I colored her using Copics. I drew a frame around the image and the background dots were stenciled using the new Polka Dots Stencil . I used my Distress ink pad Tumbled Glass and a finger sponge dauber to stencil the dots. To add some glitz to the image I applied Stickles to her wings. Sentiment is from the new   'You're my always ' sentiment set and the glitter dots are from the Winter Wishes Enamel Dots .  All products are available in the store   now! Here are the products I used on my card:                

Whimsy January 2018 Release Day 1 - Best Buds

Image
Hello and Welcome Friends! Wishing all of you a Happy New Year.  It's Whimsy Release Week and things changed a bit. We've decided to go back to the old way of our releases where everything is available starting the 1st of each month. Which means all products are available now ! Click here to see all the new goodies and  here  to go shopping for all the new goodies.  Did you also hear that Whimsy Stamps is now carrying a large line of Copic markers and other items to assist you with your coloring?   Click here  to see all of the Copic markers available. And at only $5.69 a piece, why not throw a few markers in with your new stamping goodies. Here is my creation for today using a rubber stamp by Crissy Armstrong called Best Buds as well as the new 'Brick Pattern Stencil' and 'You're my always ' sentiments'. I colored the stamp using Distress re-inkers and Distress markers. For the stenciled brick background I use

Christmas Shaker Tags

Image
Hi crafty friends! Today I want to share a set of Christmas Shaker Tags. This was one of my projects from the class I was teaching at the Whimsy Craft Retreat early October. To create the tags I used the largest of the Stitched Tag  dies and the smallest die from the Handstitched Nested Rectangles . Instead of foam tape I cut a tag frame from fun foam and adhered it with score tape. I used the    Oh What Fun  clear set and matching Oh What Fun dies to create the stamped elements and sentiments. Coloring was done with Copics. I also glued some sequins from the filling to the tag background. This way if the tags are standing upright they are not all falling down to the bottom of the tag. There will always be some visible through the shaker window. Whimsy Products used:                     Thanks for stopping by Hugs,

Whimsy Stamps November Release - Sneak Peek Day 4

Image
Happy Satruday! Have you been enjoying the Whimsy Stamps release week so far? Well we have two more stamp sets to share with you today. We're starting today with a new rubber image from Whimsy artist Crissy Armstrong called Whatzup, Dog. Don't you just love the look on his cute little face? Last month's free CAS stamp set, Snowman Tidings , will now be available for purchase starting on November 7th.  We are also introducing coordinating dies for the set this month to allow for more fun design possibilities. Here is my creation using both, the stamps and dies: The background was embossed using an older cuttlebug folder. The snowflake is from the Snow Flurry clear set and cut out using the matching Snow Flurry die s et . I stamped the snowflake with VersaMagic and embossed it using Rangers Enchanted Gold embossing powder. It has such a nice and subtle glitz to it.  Whimsy products used:             Thanks

Whimsy Stamps November Release - Sneak Peek Day 2

Image
Welcome to Day 2 of the November Release Countdown.    We have some fun products to share with you today. We are starting off with the newest rubber image from Whimsy artist Krista Heij-Barber - Sledding Time. We are also introducing our newest flower die, the Hellebore flower.  You can pair it with regular patterned paper, card stock or use the amazing  Foamiran  that is available in the Whimsy store. For my inspiration today I made a little gift box and embellished it with a Helebore flower made from  Foamiran .  I used white Foamiran    for my flower, added a berry flower center and dipped the finished flower in super fine white glitter. I used the WRMK gift box punch board to create my little gift box. The base is made from pink cardstock and I added some Christmas DP on all sides. The sentiment is from the Holiday Mini Sentiment s set. Whimsy products used:         Thanks for stopping by! Hugs, 

Whimsy Stamps November Release - Sneak Peek Day 1

Image
Hello and Welcome to Day 1 of the November Release for Whimsy Stamps . We have lots of fun products to show you over the next 5 days. As a reminder, all new products will be available to purchase in the Whimsy Store starting on November 7th. In our rubber line of stamps, we are introducing you to Eleanor today, the newest image from illustrator Sylvia Zet. Here is what I came up with using this cutie: I colored her using Distress Markers (list of colors used below) then fuzzy cut her. The background was made using Gelatos  (Elderberry) - I applied it, rubbed it with my fingers and smoothed it out with a wet brush. Silver metallic liquid water color, white paint (Sharpie paint marker) and black distress marker where sprinkled all over the background. I adhered the image with foam tape. The sentiment is from the St. Nicholas clear set. I stamped the greeting with VersaMark onto black cardstock and heat embossed it white. A few silver star sequins complete the

Whimsy Stamps 31 Nights of Halloween Celebration - Franken Monster Birthday

Image
Hi everyone! I am back today with my second creation for Whimsy's  31 Nights of Halloween celebration over at the Whimsy Inspirations Blog ! There is still time to participate in our games to have the chance of winning some spooktacular prizes! Make sure you don't miss this! This time I have a birthday card to share using the awesome  'Franken Schmutz'  clear set by Deb Davis. I love this Franken monster, he is so cute. I also like that this set can be used for a variety of cards, it really is versatile! I decided to go with blue and violet colors and also include a little shaker circle. The background was made using Distress inks/crayons in tumbled glass, shaded lilac, wilted violet and seedless preserves. First I applied a color wash with Distress inks and let it dry. Then I used a Tim Holtz stencil (Bubble) and Distress Crayons to add some texture to my background. Some spritzers of water finish off the background. All the elements were stamped

Let it Snow

Image
Happy Sunday Everyone! I am here today to share a clean and simple card using the Whimsy Snow Word & Snow Caps die set  and the Snow Flurry clear set both designed by  Deb Davis . I sponged a white panel of cardstock with different blues of Distress Oxide Inks. I then stamped some Snowflakes from the  Snow Flurry   clear set with Versamark ink onto the sponged card panel and embossed them with white and silver embossing powder. I also stamped some snowflakes in dark blue for a nice contrast. Using the word die from the  Whimsy Snow Word & Snow Caps die set  I cut out the word snow from my already inked and embossed panel. I also cut out the word snow from a sheet of white fun foam. I adhered the snowflake panel to my card front. Filling the die cut letters with the matching fun foam die cuts and on top of the fun foam I glued the die cut letters from the snowflake panel. Make sure the snowflakes line up nicely. I love the effect it gives with the word cut o