August 29, 2020

Sweetness

Hey Friends - Happy Saturday!

On my card today I showcase several Whimsy products - Calico 6x6 Papers, Inlaid Bubbles die set and Polka Dot Pals Louisa

I went with bright colors for my card and used BG colors in Louisas clothing and a matching purple for the Inlaid Bubbles frame. I colored with Copics. The sentiment is included with the Polka Dot Pals set.
Thanks to the gorgeous papers and fun frame this card was quickly made.


Here is a list of all Whimsy products used:


Polka Dot Pals Louisa Clear Stamps - Whimsy Stamps   *NEW Inlaid Bubbles Die Set - Whimsy Stamps   *NEW 6x6 Paper Pack - Calico - Whimsy Stamps   

3D Foam Squares - White   Nuve - Deluxe Adhesive  


Be safe and stay healthy!

Hugs,


August 28, 2020

Whimsy Stamps Celebrating Slimline Dies - Instagram Hop

Hello Friends!

Whimsy Stamps’ is the innovator of slimline dies, having been the first company to manufacture and introduce dies designed to help you create those increasingly-popular, slimline cards. To celebrate that achievement, we are having an Instagram hop and giving one lucky follower a $25 gift certificate to the store. The hop starts now (August 28th at noon) on @whimsystamps IG account and is open until Monday, August 31st at midnight EST.  

There is also a video hop alongside this IG hop. Another chance for you to win a $25 gift certificate. It starts at the Whimsy Stamps video channel on YouTube. 


To join in on the celebration I made this card using the Slimline Connected Bubbles die from Whimsy's slimline collection and the Best Fishes clear stamps set with the coordinating Best Fishes Sentiments set, both illustrated by Crissy Armstrong.


How I created this card:

I started out by creating the BG layer using Distress Stains. I used Bristol smooth paper and spritzed it with water. Then I used the Distress Stains dauber bottles to add the different colors of stains to the wet paper and let it dry. I also wanted to add some sparkle and used Ink on 3's liquid pixie dust which I sprinkled all over the BG panel using a brush.

I stamped the images onto Bristol smooth cardstock with Versafine black onyx ink and colored using my Karin Brushmarkers. I then cut all the images out.

The Connected Bubbles slimline die was die cut from white cardstock. In addition to the cut out connected string of bubbles I also kept one of the inner pieces from one of the larger bubbles. I wanted to use it as background for my sentiment. I used transparent glitter paste, which I added using a brush,  for extra bling and let it try. Meanwhile I stamped the sentiment from the Best Fishes Sentiment onto black cardstock with Versamark ink and heat embossed with white embossing powder.

To assemble my card I glued the Connected Bubbles onto the background panel. On the back of each of the cut out images I adhered a piece of foam tape and then arranged them on top of my background panel. I did the same with the sentiment. Once I was satisfied with the arrangement I removed the backing paper from the foam tape and adhered them. 

The final touch was adding some sequins and dew drops as well as adding Stardust Stickles to parts of the images.


Here is a list of all Whimsy products used:


Slimline Connected Bubbles Die   Best Fishes Clear Stamps   Best Fishes Sentiments Clear Stamps  

 3D Foam Squares - White   Nuve - Deluxe Adhesive   Karin Brushmarker Pro - Cool Aqua 204 - Whimsy Stamps


Thanks for your visit today. Have fun hopping with us and good luck!

Be safe and stay healthy!

Hugs,


August 21, 2020

Sugar Skulls - Another Whimsy Mini Release


Hi Everyone!

It's Whimsy Release week again and there is a nice selection of sugar skull products to choose from this time together with some other spooky items. On my card I feature the NEW Sugar Skulls clear set today together with the NEW Slimline Scallop Peekaboo 1 die.

When I saw these Sugar Skulls they were screaming BLING to me...lol. So this is why a whole array of rhinestones found their way on to my card. For me just the perfect fit with these images.
I also wanted the peekaboo windows to stand out so I die cut them from black cardstock and the scallop frame from green cardstock. I also added some pretty designer paper as a layer on top of the peekaboo windows from the NEW Sugar Skulls 6x6 paper pack before adhering my images. I stamped onto Bristol smooth paper using Versafine Clair Nocturne ink and colored the Sugar Skulls with Karin markers to match the designer paper
I used lots of clear rhinestones to create a frame around my card and to add the desired amount of bling.


I kept the inside of the peekaboo window simple. I just stamped the background using one of the NEW Natures Skeleton images with Versamark ink and heat embossed with clear embossing powder. The sentiment is from the Fly By set, stamped in black and cut out.


Whimsy products used for my card:


**NEW Sugar Skulls Clear Stamps - Whimsy Stamps    **NEW Slimline Scallop Peekaboo 1 Die - Whimsy Stamps    **NEW Nature's Skeleton Clear Stamps - Whimsy Stamps   **NEW 6x6 Paper Pack - Sugar Skulls - Whimsy Stamps

3D Foam Squares - White   Nuve - Deluxe Adhesive   Karin Brushmarker Pro - Cool Aqua 204 - Whimsy Stamps


Thanks for your visit today. Be safe and stay healthy!

Hugs,

August 17, 2020

Back To School


Again a card using the fabulous NEW AlFA Doodles by Faye Wynn Jones from Whimsy Stamps - released earlier this month.

This time I did not color the letters. I stamped them with Versafine Clair Nocturne ink onto white cardstock and cut them out. Then I combined them with Copic colored images from the NEW Polka Dot Pals Delia clear stamp set to create my back to school card. I added a pop of color to the background using one of the papers from the NEW Birthday Celebration 6x6 paper pack


List of Whimsy products used:

**NEW AlFaDoodles Clear Stamps - Whimsy Stamps   *NEW Polka Dot Pals Delia Clear Stamps - Whimsy Stamps   *NEW 6x6 Paper Pack - Birthday Celebration - Whimsy Stamps

3D Foam Squares - White   Nuve - Deluxe Adhesive   


Thanks for visiting!


August 11, 2020

More New Whimsy Stuff - Baby On Board


Hello Everyone & Happy Tuesday!

Today I have a baby card to share where I combined two different kind of stamps. One is a Crissy fairy stamp from the NEW Fairy Dreams rubber set and the other is one from Dustins collection called NEW Hedgie Love and is a clear set. I combined the two images by stamping the stork image onto Bristol smooth paper with watercolor friendly ink and then masking it off and stamping the fairy.  I included a little shaker element but kept the card overall very clean and simple. 

I cut out the shaker window using the square element from the Slimline Card Builder die set. I colored the images using my Karin Markers  and a waterbrush. Adding Nuvo Glacier Paste in Haute Red to the stork's  beak and feet creates a bit of bling and shine. 


Two layers of clouds and the sentiment finish off my card. The sentiment is included with the Hedgie Love set and to create the clouds I used the Grass & Cloud Edger die set. 


Here is a list of all Whimsy products used:


**NEW Fairy Dreams Rubber Cling Stamp - Whimsy Stamps   **NEW Hedgie Love Clear Stamps - Whimsy Stamps   Grass and Cloud Edger Die Set   **PREORDER Slimline Card Builder Die - Whimsy Stamps  

Nuve - Deluxe Adhesive   Crafty Foam Tape White       Karin Brushmarker Pro - Cool Aqua 204 - Whimsy Stamps


Hugs,


August 10, 2020

Whimsy Stamps August Mini Release #2 - Spooky Times!

Hello Friends & Happy Monday! 

It looks a lot like Halloween! It's the second Whimsy Mini Release today for August and we are officially starting the Halloween Card Season. There are a lot of fun products in this release including some awesome new slimline dies! You can see all the new released products HERE


For my Slimline Halloween card I used the NEW Spooks and Spells clear set from Krista's collection and the NEW Slimline Stars Background die.

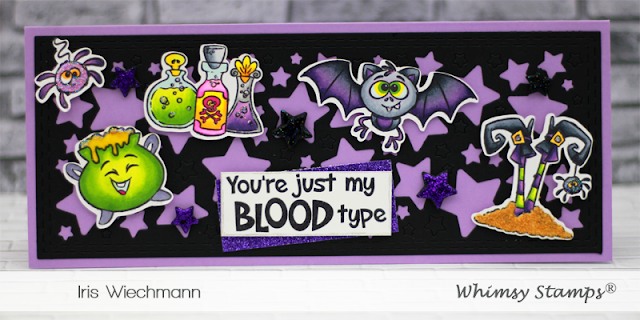
To make my card I first stamped all images from the Spooks and Spells clear set onto Copic friendly paper (e.g.Hammermill Digital Cover Stock) using Memento Tuxedo Black ink. Then I colored the images with my Copic markers and fussy cut them. I die cut the Slimline Stars Background from black cardstock and my card base (8.5" x 3.5") is made from purple cardstock to give some contrast. I saved some of the die cut stars from the background for decorating. 


I added some details to my images like Distress Embossing Glaze to the overflowing liquid in the kettle, Stickles Stardust to the Spiders, Flower Soft to the mound around the witch legs and silver shimmer to the bubbles of the mixtures. I also added purple and black Stickles to some of the die cut stars. 

The sentiment was stamped with Versafine Clair Nocturne ink onto white cardstock. I cut out a piece of purple glitter paper to layer behind the sentiment.

To assemble my card I adhered the Slimline Stars Background to the card base. I then added the images and sentiment on top of the stars panel using foam dots. Finally I decorated my card with the glittery little stars I created. 


Here is a list of all Whimsy products used:


**NEW Spooks and Spells Clear Stamps - Whimsy Stamps   **NEW Slimline Stars Background Die - Whimsy Stamps  

 3D Foam Squares - White   Nuve - Deluxe Adhesive   


Thanks for visiting! Take care and stay healthy!