August 24, 2018

Gratitude, Happy Birthday & Some Gel Press Printing.

Happy Friday! I want to share two cards today. One uses again alcohol inks on YUPO paper and the other one a technique called gel press printing.

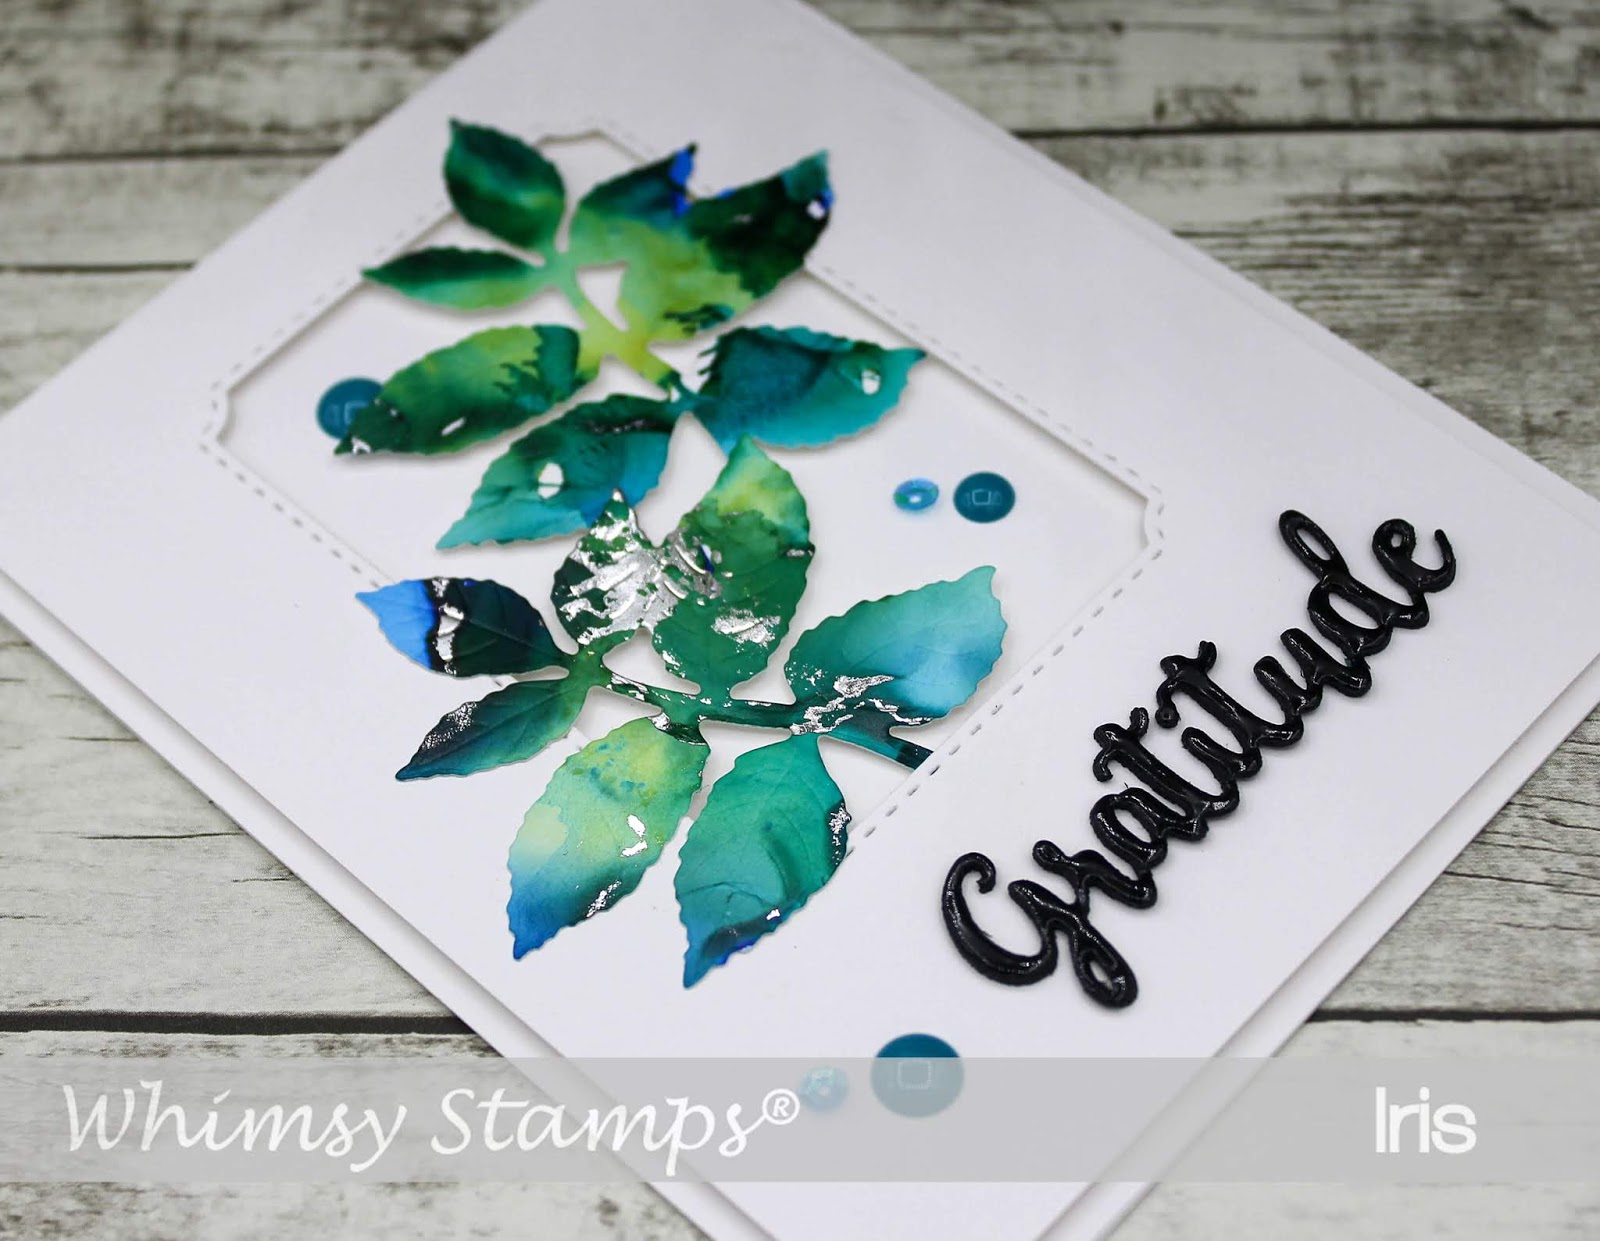
Here is my first card where I used one of the alcohol ink BG's I made recently and I cut out two leafy branches using the Whimsy die set Leaf Foliage 2 from the Crissy Armstrong collection.


I am really in love with these alcohol ink backgrounds with added foil. That really makes them stand out and pop. I cut out the leafy branches from YUPO paper using the Leaf Foliage 2 set. The window was die cut using the newly released Notched Rectangle die set. I adhered the branches using foam tape and glue dots.


The word gratitude - from the Gratitude Word die set -  was die cut 3 times from heavy weight black cardstock.  I adhered them on top of each other using Nuvo Deluxe adhesive and then on the card front. To make the word even stand out more I added Glossy Accents to the whole word. A few enamel dots and sequins finish off my card.


My second card for today is an eclipse card. I used a technique called gel press printing. For this technique a silicone gel plate and paint or ink is used to create colorful layered backgrounds.


I'm not 100% sure but I think this technique was developed using acrylic paints and artists are using it to create backgrounds for collages, mixed media pieces and also for fabric printing. Recently (at least for me new) it made its way into the card making world as well. On this card I used one of my first BG's made with this technique. I already played around more and on later pieces I also used stamps with staz-on ink and this looks awesome. I will use them on future projects. I will also make a tutorial on how I do these BG's to use on my cards but first I have to play around a bit more. So be patient I will be working on a tutorial soon. But you can go to you tube and you will find lots of gel press printing videos there.

For this BG I used oxide inks, I applied the ink onto the gel plate using a brayer. I also used the medium die from the Peony Flower die set  to cut out flowers from white cardstock and used them as stencils on the silicone plate. To add an additional layer with a different color of oxide ink I used the Farmhouse Greenery stencil on the gel plate.


The word dies I used to create the eclipse effect are the large word die Happy and the word die birthday from the word die set Birthday Wishes and Magical . I did not only cut out the words from the background but as well twice from black cardstock and layered them behind the original die cut from the BG. This way you create a slight "drop shadow" to the eclipse words. I like the effect this has. A few sequins and a button finish off my card.


Here are the Whismy products I used on both of my cards:


Gratitude Word Die Set   Leaf Foliage 2 Die Set       Peony Flower Die   Farmhouse Greenery Stencil    Happy Large Word Die     Nuve - Deluxe Adhesive     Glossy Accents   Sequin Tin - Party Time   Sequin Tin - Mixed Berry   Enamel Dots - Summer Breeze   


Thanks for visiting me today here on my blog!

Hugs,


August 20, 2018

Happy Hello

Hello and Happy Monday All! I have more alcohol ink creations coming up. One of them is the card I want to share today.

On this card I used several different Whimsy products. Everything from the Whimsy store I used on my card will be linked below.


First I created an alcohol ink background on YUPO paper with red, orange and yellow colors and applied red foil marbles. (How to do this can be found here). Then I stamped the Flower Puffs Background with Versamark ink and embossed with white super fine detail embossing powder. Heat embossing on YUPO paper is a bit tricky because YUPO is a synthetic paper and is very heat sensitive like vellum or acetate. Make sure your heat tool is very hot before you start melting the EP. Move your heat tool constantly do not stay in one spot too long or the YUPO will warp. Only apply heat in short intervals.

The word HAPPY was die cut from white heavy weight cardstock three times using the Bold ABC die set. I layered the letters to get a 3D effect. I die cut the foliage branch once from the same alcohol ink background and twice from red cardstock - layered in the same way as the letters. 

The word hello is a chipboard element also available from Whimsy stamps. I heat embossed the backing layer white and colored the main word with a red Copic marker.

I cut a piece of red cardstock and die cut one side using one of the Envelope Edger dies and on the opposite site I used the Straight Edger die set.

After assembling my card I added enamel dots and sequins to embellish. On the bold letters I added dots with a glue pen and after they dried I added red foil. I got this idea with the glue pen and foil from Jennifer McGuire. Love it and works great.


Whimsy products used:


Hello Word Chipboard   Straight Edger Die Set    *NEW Bold ABC Die Set   Copic Sketch Markers Cadmium Red [Pack Of 3] (3PK-R27S)   *NEW Envelope Edger Die Set     VersaMark Full-Size Ink Pad - Original (Clear)   White Embossing Powder    Christmas Cheer Enamel Dots     Leaf Foliage 2 Die Set    Sequin Pack - Sugar Maple       


Hugs,


August 16, 2018

PaperDoor - More Panda Butt Inspiration!

Hello Friends, Wishing You All a Wonderful Thursday and Welcome to More PaperDoor Inspiration!  Today I want to share another project I made using the August PaperDoor Kit - the super sweet Panda Butt!


Here is my card for today:


I really like how this turned out, so crisp and clean! The Pandas are colored with Copics and the Bamboo is stamped with Versafine Clair Verdant pigment ink. The sentiment is included with the set, also stamped with a Versafine Clair pad - Nocturne. The three little glittery dots are made using the lime green glitter tape included with the kit. What I did: I adhered a piece of tape onto a scrap piece of cardstock and punched out different size holes with a hole punch - or in my case with my Crop-A-Dile. The circle is die cut using the Slip 'n Slide die set. All Whimsy products are linked below. 


Here are the links to the Paper Door Kit depending on your location - the postage is included in the price shown:


Don't forget that the Paper Door Kits are only available until August 25th! Make sure you get yours today. 
 I also want to mention that this is NOT a subscription. If you buy this box there are no strings attached. You will only buy this one box and no obligations to buy the next one! So feel free to buy with confidence and without pressure of a subscription.


Whimsy products used:

   VersaFine CLAIR Ink Pad - Nocturne (black)   VersaFine CLAIR Ink Pad - Verdant   Slip 'n Slide Die SetCopic Sketch Markers Cadmium Red [Pack Of 3] (3PK-R27S)    Nuve - Deluxe Adhesive


Thanks for dropping in today! 

Hugs,


August 15, 2018

Purre Love & Gold Marbled Background How-To

Happy Hump Day! My alcohol inks were sitting around unused for quite a while now. Some how I did not find the time to sit and play with them. Until two days ago when I had trouble falling a sleep and decided to have some night time fun in my craft room - LOL-

A while ago I saw a video on YouTube (unfortunately I can't remember from whom) where someone made an alcohol ink background and then used gold foil on top of it. This looked so very pretty that I had to try! It is very easy too! Here is how it turned out and I'll explain below how I did it.


Isn't this pretty? IRL the shine of the gold foil is amazing! It's hard to catch all the shine in the photo but I think you can get an idea. I used YUPO paper for this technique.
YUPO is a non-porous plastic kind of paper. Ranger sells it in the tim Holtz line as well as other companies. I bought mine from Amazone, I think the brand is Legion. It was a better deal than the Tim Holtz Yupo. It is not real paper nor cardstock, it's made from plastic. This is the perfect surface for the alcohol ink. 

I dropped different pink and purple colored alcohol inks onto a piece of YUPO paper together with alcohol blending solution. I used Rangers alcohol inks for this. To move the ink around you can use a straw or an air puffer tool but I used my Copic air brush tool (without a pen in there of course) and my compressor. I added ink and blending solution until I was happy with the look of my background. Then I waited just a little bit to let the ink starting to dry. 1 to 2 minutes max. depending how warm or cool the room is you are working in. The spots where the ink is pooling together stay wet longer and is kind of sticky, this is what we use to make the gold foil stick. I added the ink and then moved it around using the air blowing from my airbush tool to create smaller and larger areas of "ink clusters".

Now take a piece of gold foil (the one you would normally use with a laminator, mink machine or special gel to make it stick) and put it on top of your background. With your fingers smooth it out and apply some pressure carefully. Do not use your fingernails to rub it down this will ruin your alcohol ink background. Believe me I know first hand - hahaha. If you use your nails you will see ugly marks on your alcohol ink background later! Now peel it off and voila! The gold foil is sticking to all the wet/sticky areas and you have a beautiful gold marbled looking background.

The stamps I used to create my card are from Whimsy's Purre Love clear set and You're my favorite sentiment set - both by Deb Davis from Amped to Stamp.

I stamped onto water color paper, colored with distress inks and fussy cut the images. Some purple and gold sequins finish off my card. Whimsy products used are linked below.


Whimsy products used:
(Affiliated links used - clicking one of these links is absolutely at NO cost to you.)

*NEW Purre Love Clear Stamps   *NEW You're My Favorite    Nuve - Deluxe Adhesive    VersaFine CLAIR Ink Pad - Nocturne (black)   Sequin Tin - Mixed Berry   Distress Ink Mini Pad - Seedless Preserves   Distress Ink Mini Pad - Picked Raspberry   Distress Ink Mini Pad - Wilted Violet   Distress Ink Mini Pad - Mustard Seed   Distress Ink Mini Pad - Tea DyeDistress Ink Mini Pad - Black Soot   Ranger® Artist Brushes SetCopic Sketch - W3 Warm Gray   Copic Sketch - W0 Warm Gray


Thanks for visiting me today here on my blog!

Hugs,


August 10, 2018

Whimsy Stamps August PaperDoor - Panda Butt is back!

Hello Whimsy Friends! It's the 10th of the month which means it's time for this month's Paper Door kit. Due to the overwhelming popularity of May's kit, Panda Butt, which sold out in just a few days, we are bringing it back because we know so many of you weren't able to get your hands on this amazing kit.

If you want to know exactly what is in the kit, scroll down - To purchase the kit Click here


Here is my first sample made with products from this kit:


Some angled shots so you can see I used the included Action Wobblers, which makes for a nice moving  3D effect on the card:


Here is what's included in this months Panda Butt Paper Door kit:

  • EXCLUSIVE hand chosen 6x6 specialty cardstock/paper collections that aren’t available anywhere else. There are 24 gorgeous sheets of 6x6 papers in different colors and textures selected to coordinate together beautifully. 
  • Included are 3 each of 8 different papers. SIX sheets of 8.5x11 heavy weight NEUTRAL card stock in White and Black to make multiple card bases, mattes, and more. 
  • SPECIAL EDITION 4x6 clear stamp set Panda Butt” has been created exclusively for PAPER DOOR 
  • SPECIAL EDITION coordinating Whimsy Shapeology Die set “Panda Butt” to easily die cut all 4 panda images. 
  • DARICE® “Vines” embossing folder 
  • PREMIUM QUALITY embellishmentsGreen Glitter Tape and Darice® Black Pom Pom accents  
  • SIX Mini Action Wobblers to create interactive projects. 
  • NEWLY designed digital papers (2-4 designs) to coordinate with each PAPER DOOR theme 
  • PRIVATE access to PDF files with step by step instructions for at least 4 different projects and other bonuses 

    Here are the links to the Paper Door Kit depending on your location - the postage is included in the price shown:


    Don't forget that the Paper Door Kits are only available until July 25th! Make sure you get yours today.  I also want to mention that this is NOT a subscription. If you buy this box there are no strings attached. You will only buy this one box and no obligations to by the next one! So feel free to buy with confidence and without pressure of a subscription. 

    Whimsy products used:

       VersaFine CLAIR Ink Pad - Nocturne (black)       Copic Sketch Markers Cadmium Red [Pack Of 3] (3PK-R27S)    

     
    Memento Full-Size Ink Pad - Tuxedo Black VersaFine CLAIR Ink Pad - Verdant Nuve - Deluxe Adhesive


    Thanks for dropping in today! 

    Hugs,