October 21, 2017

Whimsy Stamps' 31 Nights of Halloween & Giveaway


Welcome to Day 21 of the Whimsy Stamps Halloween Celebrations!

Hope you all are having a wonderful weekend so far! It is my day today to post on the Whimsy blog with my creation for our 31 Nights of  Halloween Celebrations. I made a card where I used one of Whimsy's older Halloween Stamps. It's a Wee Stamp illustrated by Sylvia Zet and called Batty Boo. This is one of my favorite Halloween images of all times. I think it is stinkin' cute! Who can resist these little bats with their smooshy faces?

We are giving away lots of goodies during our Halloween celebration month at the Whimsy blog.  Denise is so generous and my giveaway for you today is this beautiful Batty Boo stamp! So if you would like to have these cute bats in rubbah then please leave a comment ON THE WHIMSY BLOG ON MY POST -click here- It's that simple, nothing else to do! One comment per person!

You have until 11:59pm on October 30th to enter. The winner will be drawn and announced on the 31st - Halloween Night - on the Whimsy blog!


I colored the image with Copics and pencils using the no-lines technique. The background was created using a Tim Holtz Stencil (I think it's called 'Crackle') and Distress Ink  Tumbled Glass. The sentiment is from the 'Dracula I Compel You' clear set and stamped with Versafine black ink onto vellum paper. I also clear embossed the sentiment to keep it from smearing.
I stamped  some of the bats included with the 'Dracula I Compel You' set onto the background panel. To give it even more dimension I as well die cut some bats from black cardstock with the matching Dracula I Compel You Die set.  The vellum paper strip was then layered on to the background panel. I fuzzy cut the image and added it with some foam tape on top of the vellum strip. To embellish and add some 'Bling' to my card I used  sequins and orange enamel dots from the Summer Breeze enamel dots set.

Here is a close-up shot of the image


List of Copics and Pencils used:

Copics 

Pumpkin:
 YR27, YR68, YR15, Y38, YR13
YG99, YG97, YG95, YG91

Bats: 
E000, E00, E11, R02, R00
RV52, RV55, RV66
BG11, BG13, BG15, BG49
N1, N3, N5, N7
BV000, BV11

Faber-Castell Polychromos:
light red violet, light magenta, crimson, rose carmine,
terracotta, burnt umber, burnt siena, night green,
cobalt turquoise, paynes grey, cold grey, copper,
light orange, cadmium orange, dark orange


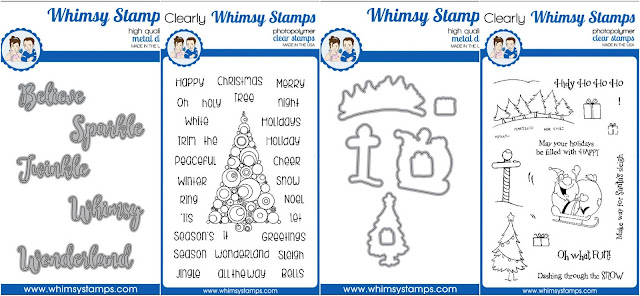
Whimsy products used on my project:
Batty Boo     Dracula I Compel You
Dracula I Compel You Die Set *NEW Summer Breeze Enamel Dots


Wishing you a great rest of your weekend and don't forget to stop by again tomorrow night on the Whimsy blog where our 31 Nights of Halloween celebrations continue!

Hugs,


October 16, 2017

Santa Spinner Card & Mirror Stamping Video


Hello Crafty Peeps! Today I have a card to share which was one of my projects at the Whimsy Craft Retreat earlier this month. It is a spinner card which also involves mirror stamping. It's a really fun project and Whimsy Stamps has now mirror stamps in the store to buy.


This super cute image, as well as the sentiment and background image are all from the Oh What Fun clear set by Deb Davis. In the video (scroll down) you will see the image from both sides.

The sprinkles around the image were created using Brusho. I also added glitter for some sparkles.
On the inside I've added snow texture paste and more glitter underneath the trees as well as on top of the trees.


Here is a little video on how to mirror stamp to create the image I used on my spinner card.


Whimsy supplies used:


Oh What Fun Die SetOh What Fun          *NEW Mirror Image   Lisa's Starry Night Sequin Pack


Thanks for stopping by!


September 25, 2017

Darling Daisies - watercolored

Hello crafting friends! Today I want to share a card with you where I used an older Whimsy rubber stamp called Darling Daisies, from the Crissy Armstrong Collection.

I used my ZIG Clean Color Brush Markers to stamp the image as well as color it. This was a new technique for me but I have to say I really do like it. I like the soft watercolor look and the 'no-lines' effect.


I took the stamp and mounted it onto a stamping platform. I used my Mini Misti for that. I then colored directly onto the stamp with my ZIG pens. One color after another and stamping in-between color applications. An easy task if you use a stamping platform. 

After stamping I let the image dry some what. I used a waterbrush to soften the stamped lines, added more color with my ZIG pens (i applied it directly to the paper with the ZIG pen) and colored and softened it again using the waterbrush. For the petals and the stems/leaves I used the lighter color to stamp and darker color to add some more depth. Except for the flower-head where I used the darker color to stamp. It is such a fun technique and I'm totally in love with the outcome and watercolor effect. Especially for flower images this technique is awesome. I'm sure you will see me using it on other images too in the future. The background was done using Distress inks (pads)


The paper I used is Canson cold-press 140lb watercolor paper. For this technique I liked to have a bit more of a rough texture unlike my smooth hot-press paper which I usually use to watercolor stamped images.

The sentiment is from the Wedding Day clear set. 


Colors used:

ZIG Clean Color Brush Pens:

Olive Green (used for stamping), Mid Green,
Bright Yellow, Light Brown (used for stamping),
Pale Grey (used for stamping), Haze Blue, Shadow Mauve (used for stamping)

Distress ink pads (for background):
Antique Linen, Frayed Burlap

Other:
Wink of Stella clear - to add some sparkle to the flower-head


Whimsy products used:
Darling Daisies    Wedding Day    Christmas Cheer Enamel Dots


Thanks for visiting!


September 18, 2017

Support Needed! - Whimsy Stamps Special Hurricane Irma Relief Set!

Hello crafty friends!  Please join us to support the disaster relief efforts underway in Southwest Florida in the aftermath of Hurricane Irma.
Purchase the special Helping Hands clear stamp set illusrated by Whimsy illustrator  and Florida native Deb Davis. The set will be on sale from now through December 31st, 2017 and Whimsy Stamps will generously donate ALL proceeds from the sale of each set to our local Southwest Florida charities to aide in disaster relief efforts.
This set is available to purchase as a pre-order now for $14US and will begin shipping in mid October.


Image may contain: text


Here is a card I made using this special set


The background was made using Brusho powders and it actually matches the card base pretty well. It just looks different in the photo. I've added some sequins to embellish the card and Stickles for some bling.


Thanks for stopping by


September 5, 2017

Whimsy September Release Countdown Day 5


Hi Crafty Peeps! We've made it to Day 5 of our Whimsy September release countdown week where we will be showing you the last of the new goodies available in just 2 days.

Syliva Zet has an adorable image in her Wee Stamps line, Wishlist.


We are finishing off the clear lineup with last month's CAS set which will now be available for purchase, Just Dance. It also has coordinating dies available.  We are also showing you the newest CAS set that can be earned for free with a $75 minimum purchase - Meowy Kittymas.


Here is my sneak peek for today using the adorable Wishlist from Wee stamps! He will be available in rubber on Thursday!


I colored him with Copics. The background was done using the Copic airbrush system and a Tim Holtz stencil. The die is from the NEW Winter Wonderland Word dies also available Thursday!

List of Copics used:

Skin: E000, E00, E21, E11
Hair: E29, E25, E21
Red: R12, R22, R24, R29
Green: G40, G43, G46, G29
Blue: B41, B45, B000
Brown: E41, E42, E43, E44, E47
E70, E71, E74
Grey:W1, W3, W5
Paper: E50, W2
Colorless Blender
Other:
Wink of Stella gold and clear pens


Thanks for stopping by and see you again tomorrow when we do a recap of all goodies to be relased on Thursday! 
Hugs!

September 4, 2017

Whimsy September Release Countdown Day 4


Hey Y'all! We are one day closer to the September release and for our clear line, we have Abstract Christmas, Oh What Fun with its coordinating dies and the Winter Wonderland Word dies to share today.


Our rubber artist featured today is Crissy Armstrong. You all love her sweet penguin images and she has more for you this month along with some others. We have Penguin Sweetheart, Penguin Warm Winter Wishes, Christmas Deer, Christmas Elf and Fleece Navidad.


Here is my inspiration for today - Abstract Christmas:


The background was created using an acrylic block and Distress inks. I just smooshed on the different color inks on the block, spritzt it with a water mister and stamped it onto a panel of watercolor paper. I stamped the tree using Versamagic ink and heat embossed with gold glitter embossing powder. This is really shiny and sparkly, unfortunately hard to capture in the photo.
I stamped several sentiments from the set next to the tree and added some matching sequins as christmas tree decorations.

Another angle:


Thanks for stopping by and see you again tomorrow when our countdown continues.  

Hugs!


September 3, 2017

Whimsy Stamps September Release Countdown - Day 3

Welcome to more sneak peeks on day 3 of the Whimsy  September Release Countdown! You've seen lots of fun new goodies already but there's plenty more to come :-D

Today's featured rubber artist is Lee Holland.  Snowflake Penguin and Snowman's Sled Ride are perfect for the upcoming winter months.


In our clear lineup, we are featuring the gorgeous Christmas Memories stamp set and the Christmas Branch dies.


This is also what I used today for my inspirational creation. I made two vintage Christmas tags:


I cut out tags from kraft cardstock as well as from vintage style designer papers. I stamped the images and sentiments from the Christmas Memories set onto the DP tags using Versafine sepia ink and distressed the edges with Brushed Corduroy Distress Ink. I adhered the DP panels onto the cardstock tags. Then I cut out branches from cardstock using the Christmas Branch dies. I also used some leftover cutouts from a stencil I made with these branche dies. The stencil I made is for another project and I'll show that to you another time. So I used cardstock branches and branches cut out from Mylar sheets. This gives a nice accent to the tags. Using Nuvo Crystal Drops I added some red and gold drops to some of the branches for that little extra bling. A ribbon on each tag finishes off the project. 


Don't forget all these will be available to buy on Thursday September 7th in the Whimsy store!

Thanks for stopping by and please come back tomorrow for another day of sneak peed fun!

Hugs!


September 2, 2017

Day 2 of the Whimsy Stamps September Release Countdown

Happy Saturday Y'all and Welcome to Day 2 of the September Release Countdown. Today, we are thrilled to be bringing you some beautiful new sets in our clear line, Falling Leaves, Steps to Serenity along with the Gratitude word dies. Available on the 7th of September at the Whimsy store.


We are also showcasing the newest images from Kirsten Winkelbauer - Pretty Lil Present, Gingerbread Gal and Sassy String Lights.


My card today showcases the Falling Leaves clear set and the Gratitude word dies.


I sprinkled the background with  a Wink of Stella orange pen - scribbling onto my craft mat and using a brush to sprinkle -  and several Distress Ink markers using the spritzer tool. I then stamped the tree using the Versafine sepia ink pad. The word thankful is from the Gratitude word dies. I die cut it and added lots of shimmer to with a orange Wink of Stella Glitter pen. It sparkles so gorgeously! Unfortunately it's very hard to see in the picture. But believe me the shimmer is amazing. I love these pens. I stamped the sentiment and added matching sequins to complete the card.

Here's a shot from another angle. 


That's it for today! I'll have some more to show tomorrow. Looking forward to seeing you again tomorrow.

Hugs!

September 1, 2017

Whimsy Stamps September Release Countdown Day 1

Good morning crafting friends. Exciting news!! Things have changed a bit with the Whimsy release starting this month! From now on each month from the 1st through the 5th, we will be introducing a few new sets from both the rubber and clear line. The Whimsy DT will be showing you some great inspiration over these days. On the 6th of each month, the DT will be showing additional inspiration to help you make your final list of goodies needed. :-)

On the 7th, everything will be available to purchase in the Whimsy store. 

So here are todays rubber reveals. We are showcasing the fun new rubber stamp images from Krista Heij-Barber. There is Merry Moos-mas, Reindeer Kitty and Merry Christmas Characters.


For my first inspirtional card today I choose the grumpy "Reindeer Kitty". Hahaha she is soooo adorable, don't you think? I just couldn't resist!


She's been stamped onto hot pressed water color paper with black Versafine ink. I colored her with my Kuretake ZIG clean color brush pens. (see below for a list of colors used) I have added some Wink of Stella gold glitter to the little jingle bells dangling from the antlers. The sentiment, which is also included with the stamp, was also colored with Wink of Stella Glitter pens gold and clear. For the green on the word 'bah' I used a zig pen underneath and topped it with some Wink of Stella clear to match my image. The DP is from my stash (these are some no name papers I bought quite a while ago). To embellish I just added some star sequins in cold and silver and some enamel dots from the Whimsy Christmas Cheer dots.


ZIG clean color pens used:
Oatmeal
Beige
Deep Brown
Dark BRown
Mid Green
Olive Geeen
Tea Rose
Deep Red
Light Grey
Dark Grey
Grey Brown.
Other:
Wink of Stella gold and clear

 
We also have some fun new sets from our clear line to introduce to you today. We have Caution Dog Slobber with its coordinating dies along with Caution Wagging Tail with its coordinating dies. These sets are so adorable and perfect for all of us dog lover.


No automatic alt text available.


Here is what I came up with using the Caution Wagging Tail stamp set and coordinating dies which will be sold separately.


I used my selfmade cloud stencil (a how to can be found here) to sponge some clouds onto the background (Hammermill paper) with Distress Tumbled Glass ink. Then I used Distress Pumice Stone to sponge the ground. I stamped the doggie and the bone onto Hammermill paper using Memento Tuxedo black ink. Did some shading with Copics (Dog: C4, C2, C0, R00, Bone: W3, W1, R00 ) and cut it out with the coordinating dies. I stamped the wagging tail on to my background and positioned the doggie right over it so it would give the imagination that he is really wagging his tail. I love that! I've added the dog and the bone using foam tape to give it some dimension.
Then I stamped the first part of the semtiment, the word Happy, on the backround. The word barkday and the little paws were stamped on an extra piece of paper to pop it up. DP is just a simple striped paper. I've added more paws and some enamle dots from the Party Enamel dots set to finish off my card.

That's it for today! I'll have some more to show tomorrow. Looking forward to seeing you again tomorrow.

Hugs!