Showing posts with label Whimsy Stencil. Show all posts

September 11, 2020

New Mini Release @ Whimsy Stamps - Happy Hauntings

Welcome to another Mini-Release from Whimsy Stamps! 
It's all about Halloween again *spooky*.

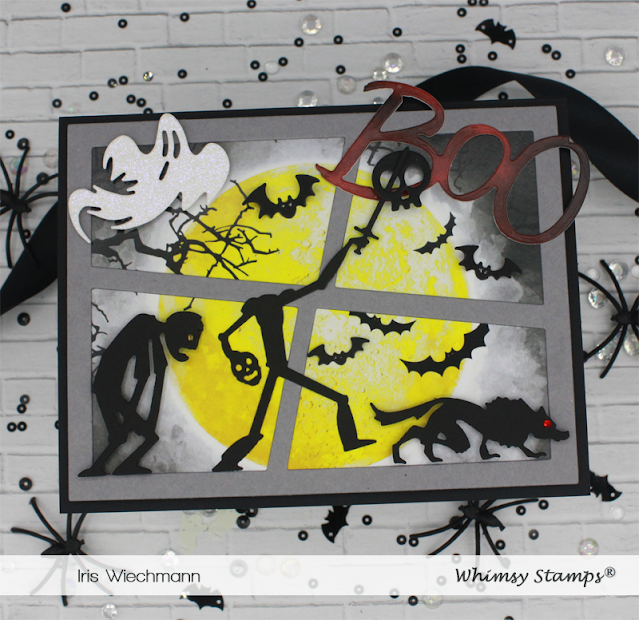
My first card was created using the NEW Monster Parade die set together with the Spooky large word die, Build a Graveyard die set (bats only) and A2 Wonky Window 3 die. Psssssst, the awesome paper for my BG is from a paper pack that will be released a bit later this month, so keep your eyes peeled! This card was created with dies only, no stamping involved.


The second card I want to share is made very quickly. I used the fabulous NEW Halloween Expressions stencil. The sentiment is from the NEW Spirited Sentiments set. I chose a layering cardstock that matches the color I used for the sponged face and added black half pearls to the eyes and my card was done! 


Here is a list of all Whimsy products used:


   3D Foam Circles - Black - Whimsy Stamps   Nuve - Deluxe Adhesive


Thanks for visiting me here today and make sure to check out the Whimsy Inspiration FB group for more awesome inspiration from the fabulous Whimsy Team!

Hugs,


July 14, 2020

Whimsy Stamps and Therm O Web Collaboration


Whimsy Stamps and Therm O Web are teaming up once again for a fabulous week of inspiration and prizes! Be sure to visit both blogs all week long for some amazing ideas and to enter to win!

Hello Everyone, welcome to Day 2 of  the Whimsy Stamps and Therm O Web Collaboration.
 I' am sharing 2 cards with you today where I used different Whimsy Stamps products together with Therm O Webs Electro-Pop Neon products.


On my first card I used the Rina K Electro-Pop neon enamel transfer sheets (Poppin' Pink & Orange Glow) and neon glitz paste (Poppin' Pink) together with the Primitive Shaker Shapes die set (Stars), Twinkle Stencil and Bold Statements.


How to create my card:

Card base in white, top-fold A2 size; black cardstock panel 1/4" smaller than card base,
white cardstock panel 1/2" smaller than card base, white cardstock, black cardstock

Using the white cardstock panel and the Twinkle Stencil (sprayed with Pixie Spray Stencil Adhesive)
apply Rina K Electro-Pop Neon Glitz paste in Poppin' Pink to upper half of the cardstock panel.
Let dry completely.

Meanwhile add Transfer Gel Duo in a thin layer to a piece of white cardstock.
The paper piece should be big enough to die cut several stars from it.
Let the Transfer Gel Duo dry completely for about an hour. 

After it's dry cover with a piece of each orange and pink Electro-Pop Neon Enaml Transfer Sheets (Rina K).  Now run it through a die cutting machine or a laminator to adhere the enamel transfer sheets to the paper. Cut out several stars using the Primitive Shaker Shapes.

Stamp Sentiment onto black cardstock with embossing ink and heat emboss white; cut to desired size.

To assemble the card adhere the black cardstock layer onto the card base and the white cardstock panel on top of the black paper . Arrange and stick enamel stars with foam tape over twinkle design.
Add sentiment.


Here is my second card and I used the following products:
Electro-Pop neon enamel transfer sheets in Poppin' Pink and neon glitz paste  in Poppin' Pink together with the Beaucoup Bouquet clear stamp set, Speckled Heart Stencil and Magical Birthday Wishes clear stamp set.


How I created my card:

Card base in white, top-fold A2 size / landscape; kraft cardstock panel 1/4" smaller than card base,
 white cardstock

This time I used the 
Rina K Electro-Pop Neon Glitz paste in Poppin' Pink together with the Speckled Heart Stencil (sprayed with Pixie Spray Stencil Adhesive) on kraft cardstock. Let dry completely before continuing.

added Transfer Gel Duo in a thin layer to a piece of white cardstock again.
Let it dry completely before covering with a piece of pink Electro-Pop Neon Enamel Transfer Sheet (Rina K) and running it through a die cutting machine or a laminator. I stamped the flowers from the Beaucoup Bouquet clear stamp set using Staz On Pigment black ink and fussy cut the images.

I stamped the sentiment with Versafine Clair ink on the kraft paper panel before adding the flowers with foam tape. Finishing off the card by adhering the kraft layer to the card base and adding some rhinestones to the flower center.


Each company is giving away two $25 gift certificates - 1 here on the Whimsy blog and 1 on the Therm O Web blog. To increase your chances of winning, leave a comment on each of the collaboration posts on both blogs. Comments must be left by Monday, July 19th at midnight EST, and winners will be randomly-selected and announced on Wednesday, July 21st.


Products used for my cards


Primitive Shaker Shapes Die Set        *NEW Beaucoup Bouquet Clear Stamps   Twinkle Stencil   

 Magical Birthday Wishes Clear Stamps   Speckled Heart Stencil    Bold Statements     

Nuve - Deluxe Adhesive  Crafty Foam Tape White  


Therm O Web

Rina K. Designs Neon Enamel Transfer Sheets, Poppin' PinkRina K. Designs Neon Enamel Transfer Sheets, Orange GlowRina K. Designs Neon Glitz Glitter Gel - Poppin' Pink   Deco Foil Transfer Gel DUO - 4 fl. oz.   Pixie Spray picture

Thank you for visiting us here today!

Don't forget to follow Whimsy Stamps on:
Whimsy Stamps and Inspiration FB Group 

Hugs,


June 7, 2020

Whimsy Virtual Weekend Continues - Pencil colored Sloth on Mixed Media Card


Hey there Whimsy Friends - Let the virtual weekend fun continue!

It is day 2 of the Whimsy virtual weekend and while I was just sharing a card yesterday, today is my time to share a step-by-step tutorial with you. It includes some pencil coloring tips and a quick how-to on how I created my card. My step-by-step tutorial is now available HERE.

If you would like to get this cute sloth image for free and download my tutorial please visit our  Whimsy Stamps Virtual Weekend Event.  Closed! Image is now available to buy from the Whimsy Store HERE. There you will find lots of inspiration and have the chance to download all images, pdfs and watch the videos. All freebies will be available until tomorrow evening (Sunday June 7th). After that most of them will be available in the Whimsy store for purchase.

Please remember, do not share digital images. Rather direct your friends to the event to download the images themselves!


Here is a list for all the Whimsy products I've used:


Sloth - Digital Stamp - Whimsy Stamps          

         3D Foam Squares - White        


Nuve - Deluxe Adhesive   Stickles Glitter Glue - Star Dust    Crafty Foam Tape White    


Thanks for visiting me here today and I hope to see you at our Facebook Event.

Hugs,