May 1, 2021

Whimsy May 1st Release - All About Cake!

Hey Whimsy Friends!

There is a super duper new number and cake stamp and matching die set (sold separately) available in the Whimsy Stamps as part of the new release. I am in LOVE with the new stamps and dies 😍!

Here is a slimline card I created using the Make a Wish stamp and Make a Wish die set as well as the Eat Cake 6x6 papers. 

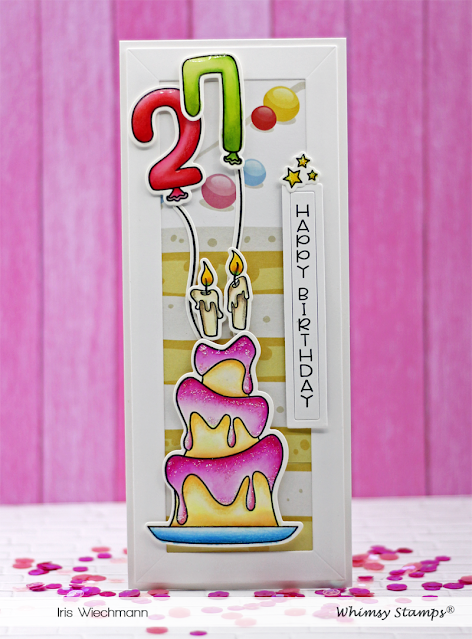
I colored the cake and numbers using Dr.Ph. Martins Concentrated Radiant Watercolors. 


I also added Stickles glitter glue to the pink cake layer. The sentiment is from the same set: Make a Wish and cut out using the Simple Sentiment Strips die set. 


To the balloon numbers I've added some 3D glaze for more dimension.


Here is a link list for all the Whimsy products I've used on my card:


Hugs,


April 30, 2021

Instagram Collaboration Hop Between Whimsy Stamps and Scrapbook Adhesive by 3L


Hello Peeps! Scrapbook Adhesives by 3L@scrapbookadhesivesby3l - and Whimsy Stamps@whimsystamps - are collaborating for a week-long event filled with projects to inspire you plus two special prizes to give away: One prize pack full of Scrapbook Adhesives by 3L adhesives and One fabulous gift certificate to the Whimsy Stamps shop!

Today - April 30th - is the final hop day! So make sure you play along if want to have a chance on winning some prizes! 


I created a Birthday slimline card for my hop project today. My card base is a portrait topfold slimline card. The frame is die cut using Whimsy Stamps Marquee Slimline die and the background paper is from the 6x6 Floral Impressions paper pack. I used 3D Large Foam Squares and Permanent EZ Runner Dots from Scrapbook Adhesives to adhere my panels. 


Then I used Whimsy's Bold ABC die set to cut out the word happy and foiled it using Scrapbook Adhesives 3D Foam Creative Embellishment kit. The word birthday was cut out using Whimsy's Birthday large word and shadow die and adhered using 3D Small Foam Circles as well as Adhesive Sheets. 


To create the flower I used Mom's Layered Flowers clear stamp set and the Poppy Flower die set. I adhered the flower using foam squares and E-Z squares. I finished off the card by adding some confetti sequins using Micro Adhesive Dots.


Link list for all Whimsy products used on my project:


List for Scrapbook Adhesive products used:


Thanks for stopping by today! 

Don't forget to come back tomorrow as it is Whimsy Release Day !!


April 29, 2021

Best Friend!

Happy Thursday! Another slimline card on my blog here today. This time it's all about our best friends 🐶. I love the NEW Slimline Dog Bone die set. It's very versatile and can be used in many ways and occasions. Make sure to hop on over to our FB group to see what other team members have created with it!
I ink blended the cardstock with Distress Oxide inks before die cutting the large bone and embossed using the NEW Wave Lengths Simline Embossing Folder afterwards.


Here are all the Whimsy products I used on my card:


Thanks for stopping by.

Hugs,


April 28, 2021

Happy Birthday Princess!

Hello there! I just love these cute Princess Dragons 😍 from Whimsy Stamps' Dustin Pike collection. I created my slimline card using the Enchanted Kingdom slimline papers, Quick Strip dies and Slimline Scenic Country Side die.

I colored the image using Derwent Inktense Blocks and Prisma Premier colored pencils. The image was stamped onto Strathmore Bristol Smooth paper with Versafine Clair Nocturn ink.


Whimsy products used:


Thanks for stopping by. 


April 27, 2021

Partial Embossing Tutorial

Hello Friends I am on the Whimsy blog today with a tutorial on partial embossing. If you are interested and want to know how I created this card please visit my post on the Whimsy blog here
There I will be showing you a partial embossing technique using our NEW Slimline Embossing Folder Thatched with a self-made embossing frame using the Slimeline Marquee Die


Whimsy stamps products used:


Hugs,


April 24, 2021

Sending Hugs!

Hey There! Here is a Springtime card I made using the NEW Sending Sunshine clear stamp set in combination with the previously released  Beaucoup Bouquet clear stamp set and Quick Strip die set. I think these are a perfect match!


The images were stamped with Versafine Clair Nocturn ink onto Bristol smooth cardstock. I colored using  Chromaflow pencils from Derwent. Love these soft smooth pencils. To create the background I sponged light blue ink onto Bristol smooth cardstock and and added white and black paint sprinkles.


Whimsy products used:


Thanks for visiting!


April 20, 2021

Whimsy Stamps 3rd Monthly Mini Release - Kiss a Frog

Hey Friends! If you are a regular here on my blog you know that it's time today to share some more NEW Whimsy fun. The 20th of each month marks the 3rd monthly mini release. 

It looks a lot like magic. We have super duper cute dragon stamps - Princess Dragon by Dustin Pike is one of them - and a fabulous Build a Castle die set by Deb Davis among other fabulous products. Together with the Enchanted Kingdom paper pack it makes for fantastically magical cards.

The image was stamped onto Harmony hot press water color paper from Hahnemühle using Versafine Clair Nocturn ink. I colored it with my F.C. Albrecht Dürer watercolor pencils and  fussy cut it.


I started creating my card by using a sheet of the new Enchanted Kingdom Slimline Papers and the die cut frame from the Slimline Birthday Scallops die. I then die cut the castle from white and purple shimmer cardstock using the Build a Castle die set. The dragons where cut from green glitter cardstock. To match my color scheme I stamped the sentiment - that is included with the Princess Dragon clear stamp set - with Versafine Clair Chianti ink. I die cut the sentiment with the second smallest die from the Extreme Postage die set. which I think complements the Build a Castle die set perfectly. I then adhered everything with liquid glue and foam tape to a horizontal top fold slimline card base.
 

Here is the link list for all Whimsy products I've used:


There will be more magically new things to share on my blog tomorrow! 

Hugs,