January 22, 2018

Cupid in Training

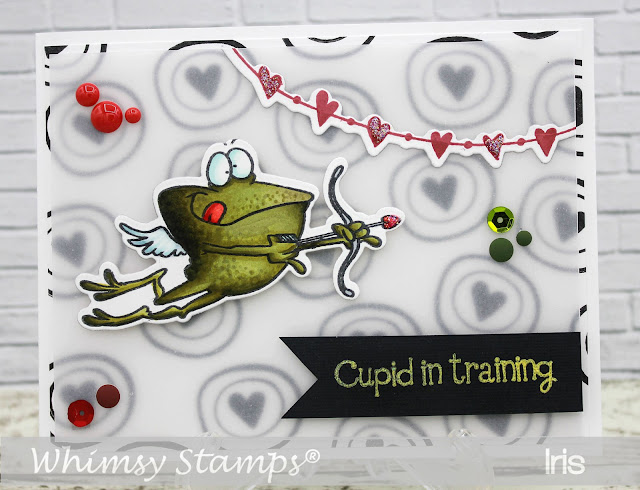
Happy Monday! I've to share another Valentines card today. I used a clear stamp set from Whimsy's December 2017 release, 'Cupid in training', as well as the coordinating dies 'Cupid in training die set'. Both are illustrated by the very talented Deb Davis from Amped to Stamp.


My card base is 4 1/4" x 11" folded cross-wise. I made my background by stamping the little target image all over a layer of white cardstock (5 1/4" x 4") using Versafine onyx black ink and attched it to my card base. I then cut a layer of heavy vellum paper (5 1/8" x 3 7/8") and layered in on top of my background using clear foam tape. I colored the Cupid with Copics and stamped the heart garland with Memento Love Letter ink. Both were cut out using the coordinating dies from the 'Cupid in training die set'. The sentiment is included with the  'Cupid in training' clear set. I stamped the sentiment onto black cardstock with Avery Elle 'Daisy' pigment ink and heat embossed with Rangers 'Enchanted Gold' embossing powder. Unfortunately it is hard to see but this EP has such a nice sparkle to it IRL. To finish up my card I added some enamel dots, sequins and Stickles Stardust glitter glue.


Copics used:

R22, R24, R29
YG91, YG93, YG95, YG97, YG99
B000, B01
BG000
C3


Whimsy store items used:

Cupid in Training   Cupid in Training Die Set   Christmas Cheer Enamel Dots   Versafine Full-Size Ink Pad - Onyx Black   Copic Sketch - B000 Pale Porcelain Blue   Copic Sketch - B01 Mint Blue   Copic Sketch - BG000 Pale Aqua   Copic Sketch - C3 Cool Gray   Copic Sketch - R22 Light Prawn    


Have a great day!


January 16, 2018

Happy Chocolate Day!

Hi Everyone! Today I have some Valentine inspiration for you. On my card I am showcasing a clear stamp set from the December 2017 release called Crazy For Chocolate, an older large word die 'Happy' and the newly released Polka Dot Stencil.


To make this card I started by cutting my card base 4.25" x 11" from heavy weight bright white Hammermill cardstock. Folding it in half cross-wise. Using the  Polka Dot Stencil and some pink Nuvo Embellishment Mousse I created the dotted background. I colored the bowl of chocolate from the Crazy For Chocolate set using Copic alcohol markers and cut it out using the coordinating Crazy For Chocolate die set. I've added Stickles Sprinkled Sugar to the top of each candy. Once it's dry it really looks like sprinkled sugar crystals. I love that it looks so real! Hre see for yourselves:


The sentiment was partly cut out from brown cardstock using the  large word die 'Happy' and the other part was stamped directly on the card base. The chocolate bowl and the word Happy were attached with some foam tape to give some dimension to the card. To add some bling I adhered pink enamel dots from the  It's a Party Enamel Dots set , brown Sequins and pink rhinestones between the polka dots.

Here is another close-up of the polka dots made with Nuvo mousse. It gives such a nice effect on the card. I love using structure paste or embellishment gels/mousse with stencils for adding dimension and special effects.


For more inspiration please also visit also my Whimsy Pinterest Gallery


Copic markers used:

R81 - R83 - R85
E23 - E25 - E27
C00 - C1 - C3 - C4 - C5

Here is a list of Whimsy products and products available in the Whimsy shop:

*NEW Polka Dot Stencil   Happy Large Word Die   Crazy for Chocolate   Crazy for Chocolate Die SetStickles Glitter Glue - Sprinkled Sugar   *NEW It's a Party Enamel Dots   Copic Sketch - R81 Rose Pink   Copic Sketch - R83 Rose Mist   Copic Sketch - R85 Rose Red    Copic Sketch - E25 Caribe Cocoa   Copic Sketch - E27 Milk Chocolate   Copic Sketch - C00 Cool Gray   Copic Sketch - C1 Cool Gray    Copic Sketch - C3 Cool Gray   Copic Sketch - C5 Cool Gray   


Thanks for stopping by!

Hugs,
Iris

January 10, 2018

Best Friends No Matter What


Hi Everyone!
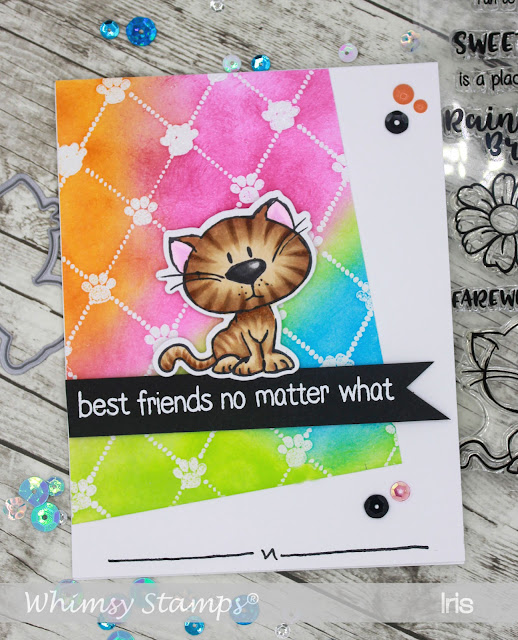
Today's card showcases several stamps and a die set from the new Whimsy January release. Most of the products used on my project are linked below.


I stamped the cat from the 'A Girls Best Friend' set using Memento Tuxedo Black Ink and colored her with Copics. I then die cut the little furry friend using the matching 'A Girls Best Friend Dies'. I created a rainbow background with the Lattice Background stamp and the coordinating Background Lattice Buddies. Here I used the little paw from this set. There are 28 little designs to choose from. This gives you endless possibilities for creating your own backgrounds. I stamped the background using Versamark ink and embossed with clear embossing powder. I then sponged the background with Tim Holtz Distress inks (mermaid lagoon, picked raspberry, carved pumpkin and twisted citron). The sentiment is from the 'You're My Always' clear set. I stamped again with Versamark ink onto black cardstock this time and heat embossed using white embossing powder. I added just a little bit of decoration to my card with a fun doodle from the FADoodles Too clear set  and attached some Sequins and Summer Breeze Enamel Dots.


Copic colors used:

E30, E31, E33, E35, E37
T8, T6, T4, T2
RV00, RV52


Whimsy products used:


*NEW A Girl's Best Friend      *NEW A Girl's Best Friend Die Set   *NEW Lattice Background   *NEW Lattice Background Buddies   *NEW FaDoodles Too   *NEW You're My Always   VersaMark Full-Size Ink Pad - Original (Clear)   Distress Ink - Mini Ink Pad Kit 1Memento Full-Size Ink Pad - Tuxedo Black   *NEW Summer Breeze Enamel Dots   Wild and Free Sequin Pack   Copic Sketch - E31 Brick Beige      Copic Sketch - E33 Sand   Copic Sketch - E35 Chamois     

January 4, 2018

Whimsy Stamps January Release - Day 4

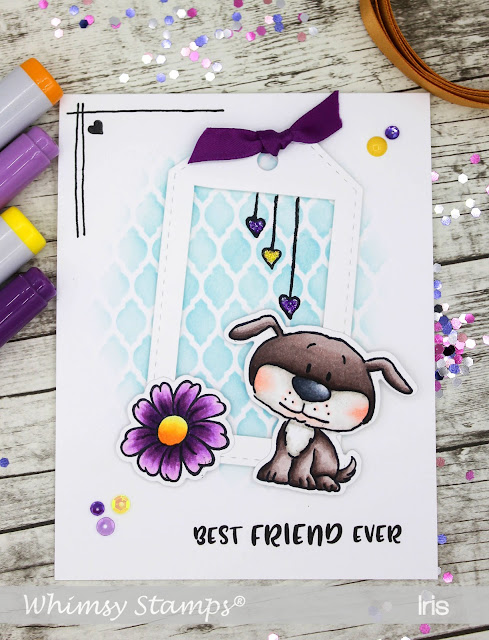
Welcome to Day 4 of the Whimsy January 2018 Release! I am a dog person, always have been. Dogs always played a big role in my life, I grew up with dogs and I can not imagine being without one. Don't get me wrong I also love cats...in fact I am a huge animal lover, period! But dogs are number one in our house. So when I saw this cute clear set from the Whimsy January release called A Girls Best Friend by Deb Davis, I just had to have a play with it.


Isn't he adorable? I colored the images with Copics and cut them out with the matching A Girls Best Friend die set. The sentiment is included with the  A Girls Best Friend clear stamp set. The background was sponged using the Formal Lattice Stencil  and Tumbled Glass Distress ink. The hearts on the string as well as the corner doodle are from the Fadoodles Too clear set. To add some dimension I die cut a tag with the largest of the Stitched Tag dies,  cut out a window with my Exacto knife so the background will show through. I adhered it with foam tape. Finishing off the card with just a few embellishemnts: Sequins, enamel dots and matching Stickles glitter glue.


Whimsy Products Used:

*NEW A Girl's Best Friend   *NEW A Girl's Best Friend Die Set   *NEW FaDoodles Too   *NEW Formal Lattice Stencil 

  Stitched Tag Dies   Orange Blossom Sequin Pack   Painted Garden Sequin Pack 

  It's a Party Enamel Dots 


Thanks for visiting me today!

Hugs,
Iris