Showing posts with label Tutorial. Show all posts

September 14, 2009

Triangle Box and Tutorial


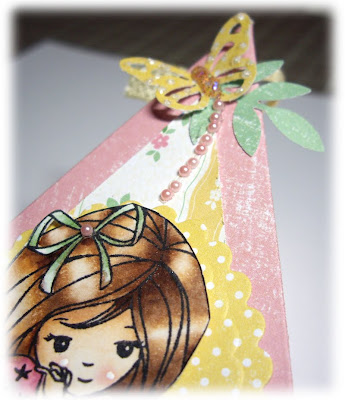
Hello Everyone and Happy Monday! Today I'll show you another little triangle box I've made. And I also prepared a little tutorial on how you can easily make one of these cute boxes. You'll find the tutorial on our Belles 'n Whistles blog where it is "Make it Monday!" today! To see the tutorial click here! We have fun things going on everyday (Mo-Fr) at the Belles 'n Whistles blog. Make sure you don't miss it as we have regular prize give aways for all visitors who like to leave us a comment. :-)

I really like these little boxes because they are quick and so easy to make, different in shape and so versatile. You can make them in all kinds of sizes and for various occasions. And even if you need larger quantities they are still quick to make.


~~~~~~~~~~~~~~~~~~~~~~~~~~~~~~~~~~~~~~


Hallo und einen schoenen Montag!!! Heute moechte ich Euch nochmal eine dieser niedlichen Dreiecks-Boxen zeigen. Ich habe auch ein kleine Anleitung dazu gemacht und diese findet ihr auf unserem Belles 'n Whistles Blog wo es heute heisst: "Make it Monday!" Fuer die Anleitung klickt bitte hier.
Taeglich von Mo-Fr gibt es was neues zu sehen auf dem Belles 'n Whistles blog. Verpasst es nicht, denn wir haben regelmaessig Preise zu vergeben fuer alle Besucher die Kommentare hinterlassen!:-)

Ich mag diese kleinen Dreiecksboxen denn sie sind schnell gemacht, mal anders von der Form her und auch sehr vielseitig. Die Groesse kann beliebig variiert werden und selbst eine groessere Menge ist schnell gemacht.




To see the tutorial click here!

Fuer die Anleitung hier klicken!


Box Recipe

highlighted products are available at

Belles 'n Whistles
Roses on Paper

Stamps/Stempel: Belles 'n Whistles - Lil' Miss Poppy
Colored with/Coloriert mit: Copics
Ink/Tinte: Memento - Tuxedo Black
Paper/Papier: CS: Colorbok, DP: Martha Stewart
Other/Sonstiges: Martha Stewart Punches: Monarch Butterfly and Pine, Ribbon/Band,
Pearl Swirls pink - Prima, Tull/Tuell, Basic Grey Brad, Spacer Bead,
Prima Flowers
, Stickles, 3D Glaze, Charm, Eyelets, Spellbinders Nestabilities
,

Thanks for stopping by and any comment you may leave! :-)


Hugs,

August 8, 2009

Copic Tutorial

Hello everyone and Happy Weekend!!!!!
Today I have no card to share but a tutorial ;-)
I was asked by some people if I could make a tutorial to show my technique of coloring using the Copic markers.
You'll find the complete tutorial over on our
Roses on Paper Project and Tutorial blog
!

And as a little preview here is a slide show:


If you have any questions feel free to email me (see sidebar)

Thanks for stopping by today! :-)

Hugs,

Copic Coloring Tutorial - Basic

Copic Coloring Tutorial - Basic


Hello everyone, hope you all are doing great! I was asked by a few people if I could do a tutorial about how I color my images using Copic markers. This is going to be the first tutorial, a very general one. Over time I'll like to post Copic tutorials on how I color specific parts of an image like hair, cloth, skin, etc.
I would also like to mention that I am not "Copic certified" and this is just my way of coloring my images using Copic markers. I tried different techniques and papers and this is just what works best for me!

Ink: I always use Memento Ink for stamping my images when coloring with copics. This is a fade resistent, fast drying, dye ink with even ink coverage and save to use with your Copics. Summer has this ink in her store, click here.

Paper:
If it comes to paper I don't accept any compromises anymore. *lol* ;-)I tried a lot off different papers. Cheap papers and expensive ones but the only paper I use for coloring with Copics is from Arjo Wiggins, Curious Iridescent - Cryogen White. This is in my opinion the very best paper to use, the colors are blending so easily and even little mistakes are much easier to remove. And it has an incredibly elegant shimmer to it. But as I said before, just MHO and everyone has different preferences.


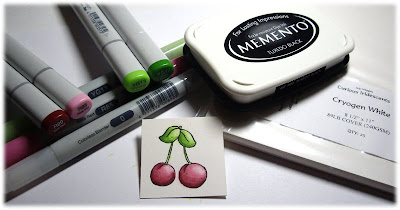
These are the products (as you can see on the above picture) used for my tutorial:

Memento Dye Ink - TUXEDO Black,
Magnolia cherry stamp,
Curious Iridescent - Cryogen White Paper,
Copics: 0 Blender Pen - YG11 - YG13 - YG17 - R83 - R85 - R89


I start coloring the leaves and stems using the colors 0 (Blender Pen) - YG11 - YG13 - YG17
Always choose colors that are not too far apart and best from the same color family.


First you have to decide where your light is coming from. In my case the light is coming from the upper right corner. I start with my darkest color first (YG17) and color that part of the leaves and stems where the most shadows/darkest parts will be. I never use pressure when coloring with my copics.


Then I move on to the next lighter color, here YG 13.

Tip: Don't worry if you color a little over the lines you can easily remove this with your blender pen. Just take your broad side of the blender pen and kind of push the color back towards the image. Do this without using too much pressure. Some colors are removed easily and for some colors you will have to repeat this procedure (e.g.the reds are kind of persistent).
If you can't get it fixed right away, wait in between your attempts and let it dry a little so you wont do damage to your paper.


With little circular movements start blending the colors together using your YG13 pen. (see above)


Now you are ready for your lightest color YG11. Do not touch the area you want to be the lightest part of the leaves with any color yet! Same here: blend the third color in nicely. With your lightest color you can also go over all the already colored areas on the leaves to get it even more blended. But not too much over your darkest areas as it will lift the color.


After all colors are blended nicely take your lightest color YG11 and your blender pen. With your blender pen touch the tip of the YG11 pen (see picture) And now with light feathery strokes apply the color (from your blender pen) starting at the edge of the colored area moving towards the white area. On and off touching the YG11 pen with your blender tip to get more color (if needed). You only want just a very little color on the lightest part and very soft and smooth edges. Be careful not to touch your already colored area too often with the blender pen as it removes the color kind of quickly sometimes! In the same way do the rest of the stems!


Now on to the cherries. For coloring the cherries I use R83, R85, R89 and the blender pen (my favorite tool ;-) )


As with the leaves I start laying down my darkest color, R89, first. Not too much just in the areas I wanted the cherries to be darkest. Always remember where your light source is coming from.


Now apply your next lighter color, in my case R85.


Blend it in nicely again.


Now it's time for the lightest color (R83), lay it down and blend, as before!
Remember leaving the part you want to be lightest on your cherries untouched!


In the same way we applied the color with the blender pen and lightest Copic color on the leaves (using light feathery strokes) do it now with the cherries. In this case R83 was used.


And voila! We've finished coloring our cherries! :-)


I hope you liked my tutorial. As I said before this is just my way of coloring with the Copics and the techniques that work best for me. And if you are new to copics don't give up too fast. Coloring with copics means practice, practice practice! Once you got the hang of it you will LOVE them!

So get out your Copics and start coloring! :-)


Hugs,


Thanks for stopping by!

Hugs,

March 7, 2009

Decorating a Candle Using Stamped Images


Materials needed:

- stamp
- stamp pad
- candle
- tissue paper
- wax paper
- preferred coloring medium
- small scissors
- glue stick
- heat gun / embossing tool
- preferred embellishments

Some tips:
White or cream candles are best and also a good quality candle makes working in this technique much easier.
I prefer to use colored pencils and gamsol with this technique. But you can also use e.g. distress inks, markers, etc.
Sample for embellishments you can use: stickles glitter glue, adhesive pearls, dew drops, prima flowers, brads, ribbon, etc.


First choose your stamp (make sure it will fit on the candle!) and stamp your image on the tissue paper.
I used table top flowers from the Alota Easter collection available at Roses on Paper.
And as I only would like to use the vase with the flowers
I didn't ink my whole stamp.


Now get started and color your image!


Cut out as close as you can to your image without damaging it. Don't worry about any "left over" tissue, this will totally dissapear when put on the candle and heated.


If you like to put on a sentiment, some decorative swirls etc. stamp and color in the same way.
I decided to put a sentiment and both sides of the candle.
The sentiment I chose is also from the
Alota Easter collection.


Now arrange your images on the candle as you would like them to be. Don't forget to unwrap your candle! To make it easier for the tissue to stick to the candle I'm using a glue stick for help. Just a little so the images won't fall of.


In the next step you wrap your wax paper around the candle and make sure the images laying flat without any wrinkles. Cut your wax paper long enough so can use the excess on the back as handle to hold it really tight whilst heating! When heating make sure you have enough distance between the tool and the candle so the candle won't melt and ruin your project. Another tip is keep the tool in motion rather than only on one spot. The image will get real shiny and the colors will look more vibrant through the wax paper when it is done and fully submerged under a fine layer of wax. The edges of the tissue paper will fully dissapear in the wax.


This is what your candle looks like after all the images are heated and covered in a fine layer of wax.


The final step will be adding some finishing touches and your embellishments if desired. If you like to use brads for decoration it is very easy to push them into the candle as long as it is still warm from heating.


This is how my finished project looks like and also 2 more samples done in the same technique.


I hope you liked the tutorial and I could inspire you a little to try this wonderful technique!
Don't forget to check out Summers store for all your stamping needs.


Wishing you all a great start in the week


Thanks for stopping by!

Hugs,